How to: Private Network and Custom VPN
A Private Network is a collection of interconnected devices that are not accessible to the public internet. These networks usually include a variety of devices, such as laptops, PCs, cell phones, cameras, and more. People might have different reasons for creating a private network, but for me, having one means I can access any of my devices from anywhere on Earth (or maybe even Mars!) as long as they're connected to the internet .. haha
For those who aren’t software engineers (or tech enthusiasts), this might sound like a solution to a problem we invented. But having a private network has real benefits. Here are some scenarios where it helps:
- Development and Testing: Developers often run software on their machines and test it on multiple devices to ensure it’s working as expected.
- Security: I take security seriously (yes, I have an Alexa, but it's mostly turned off). My passwords are encrypted with a GPG key and stored on one of my devices—not on any third-party platform. So, if my devices are interconnected, I can easily access my passwords from anywhere.
- Data Transfer: Transferring data becomes very easy. Most of my devices (including my phone) have some form of FTP and SSH servers installed. I can connect to my phone from my laptop using FTP to access files and photos. If I'm away from my laptop, I can SSH into it from my phone and run practically anything.
- It’s Cool to Share: I told some friends about my private network, and they all responded with "Cool!" Probably the best response an engineer expects when showing off their work. Haha!
So yeah, these are some of the reasons that make networking worth exploring—even though I don’t know much about it.
Setting Up a Private Network
If we lived in the ‘90s, we’d probably be coding our own networks from scratch, configuring every little bit ourselves. Luckily, that’s not the case anymore. There are Software as a Service (SaaS) solutions that handle most of the work. All we have to do is install them and complete a basic configuration.
For this project, I chose Tailscale. So, what is Tailscale?
Tailscale is a VPN service that makes the devices and applications you own accessible anywhere in the world, securely and effortlessly. It enables encrypted point-to-point connections using the open-source WireGuard protocol, meaning only devices on your private network can communicate with each other.
I chose Tailscale over other alternatives because it seemed very easy to set up. Also, it's built on the WireGuard protocol, which is faster than OpenVPN (though I’m mostly using it for its ease of setup).
Tailscale
On their Download page, you’ll find pre-built binaries for popular operating systems. Download it from there. If you’re on Linux or OSX, you can install it with a single command (though it’s not the recommended method):
curl -fsSL https://tailscale.com/install.sh | sh
After installing, follow the on-screen instructions. Once installation is complete, you’ll need to add one more device to complete the network. Follow the same steps to install it on other devices.
Making it a VPN in the True Sense
Now that we have a network, we can explore its functionalities (such as transferring files, etc.). To make things more interesting, we can also mask our location—pretending to be browsing from a different country while physically being in our home country. This is useful for accessing websites banned in your country or testing how a webpage/app appears to users from other countries.
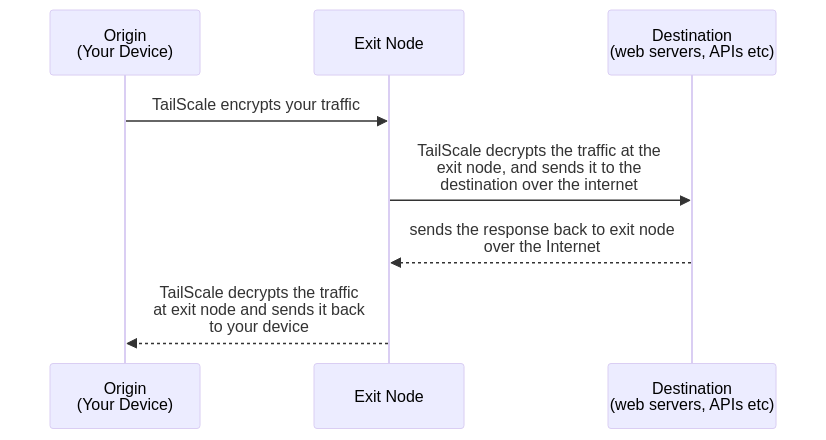
To do this, we’ll need an Exit Node. An exit node is a (physical or virtual) device from which traffic exits to the internet. All traffic from your Tailscale private network will be routed to the exit node (if enabled), and then it exits to the internet from there.
To simulate being in another country, simply set up exit nodes in those countries. I use virtual machines for this because they’re affordable and easy to configure.
Hetzner offers cheap servers, though their data centers are only in Germany. That works for my use case, but if you need other locations, AWS or GCP have data centers in multiple regions.
Once you get a VM, SSH into it, and install the Tailscale client. Then, advertise the server as an exit node by following these steps:
- Turn off the TailNet:
sudo tailscale down - Advertise the Node as an Exit Node:
sudo tailscale up --advertise-exit-node - Turn on TailNet:
sudo tailscale up - Go to TailScale dashboard, and approve it to serve as an Exit Node
Now, you can use that perticular node for traffic routing. Run this command from your Origin device:
sudo tailscale set --exit-node=<exit-node-ip> --exit-node-allow-lan-access=true
If you would like to stop advertising a node as an exit node: sudo tailscale up --exit-node=. And we are done here. Now, you can access websites/apps as if
you are sitting in a different country.
You can also use a physical device (like your laptop or phone) as an exit node, though the traffic will still reflect the IP address of the country you’re currently in.
So, that's it for this article. I hope you found it interesting. If you have
any questions or suggestions, feel free to reach out to me at
abdus[at]abdus[dot]net. I would love to hear from you. Thanks for reading!
